Hey fellow eCommerce folks! Ever found yourself wondering: “What is the Google Merchant Center?” In simple terms, it’s a tool that lets you show your products to people searching on Google. It’s like having a shop window that’s seen by hundreds, thousands, even millions of potential customers! Trust us, it’s a game changer for selling online. Once you start working with GMC, you’ll ask yourself why haven’t you done it sooner!
Let’s Explain What Is The Google Merchant Center (GMC)
You know when you’re scrolling through Google and those cool product ads pop up? That’s all thanks to something called Google Merchant Center! It’s a free tool from our friends at Google. It lets you create a detailed list of what you’re selling and feed it straight into Google’s system.
From there, your products get the chance to show up in all kinds of places like Google Shopping, ads on YouTube, and even image searches! It’s like giving a megaphone to your products to shout: “Hey, look over here!” to customers who are already interested in what we’ve got.
To put it simply, it’s helping you to put your products right in front of the people who are most likely to buy them.
As of July 2023, online search engine market leader Google had a share of around 83.49 percent of the global desktop search market. Just imagine the customer reach your product can get with Google!
Benefits Of Using Google Merchant Center for eCommerce
Here’s the deal folks, using Google Merchant Center is about more than just uploading our products and hoping for the best. Actually, it has some pretty sweet perks that can give our e-commerce businesses a real boost. For example:
1. Spot-on Shopping Listings
When people search for our products on Google, your items show up in a neat, catalog-like format right in the search results. This makes it super easy for potential customers to see what you’ve got to offer, increasing products’ visibility and making shopping a breeze of simplicity – and we all love it when the shopping process is quick and easy, don’t we?
2. AdWords Made Easy
Google Merchant Center plays well with Google AdWords, allowing you to link your products to specific ads. This makes advertising more targeted and effective. Plus, it’s easy to set up remarketing campaigns, meaning you can gently remind customers about the product they were eyeing earlier.
3. Analytics Support
With Google Analytics, you can keep a close eye on how your GMC is doing, separate from all the other stats. It’s like having a special report just for your product hits, giving you the insights needed to keep improving! See what works and what doesn’t, and adjust your strategy accordingly.
4. Showcase Reviews
Your product reviews aren’t hidden away. In fact, they’re front and center as part of your listings. When the products shine, they get a boost in visibility on Google. And let’s face it, we all like to see lots of stars next to a product we’re considering!
5. Direct the Traffic
With GMC, there’s no roundabout way for customers to reach you. Once people click on your product listing, they’re taken straight to your eCommerce site. It’s a direct path from browsing to buying, making the shopping experience smooth and easy!
6. Local Search Integration
For those of you with physical stores as well – worry not, because GMC has you covered! Your listings can include geographical tagging and guiding local customers right to the store’s door. It’s an amazing way to boost online sales, and also to increase foot traffic to your brick-and-mortar shop!
7. It’s Free
As mentioned before, all these benefits don’t cost a penny to use. It’s free to set up GMC, and you only pay for the ads you decide to run. It’s a win-win situation for any business, don’t you think?
We can’t forget to add one more thing: did you know that Google is the leading Search Engine for the mobile market as well? In December 2022, Google accounted for 96.17 percent of the global mobile search engine market worldwide! And with phones being the preferred platform for surfing, this number can only get higher as the years pass.
Now that you know all the benefits, let’s explain how to set up your Google Merchant Center account!
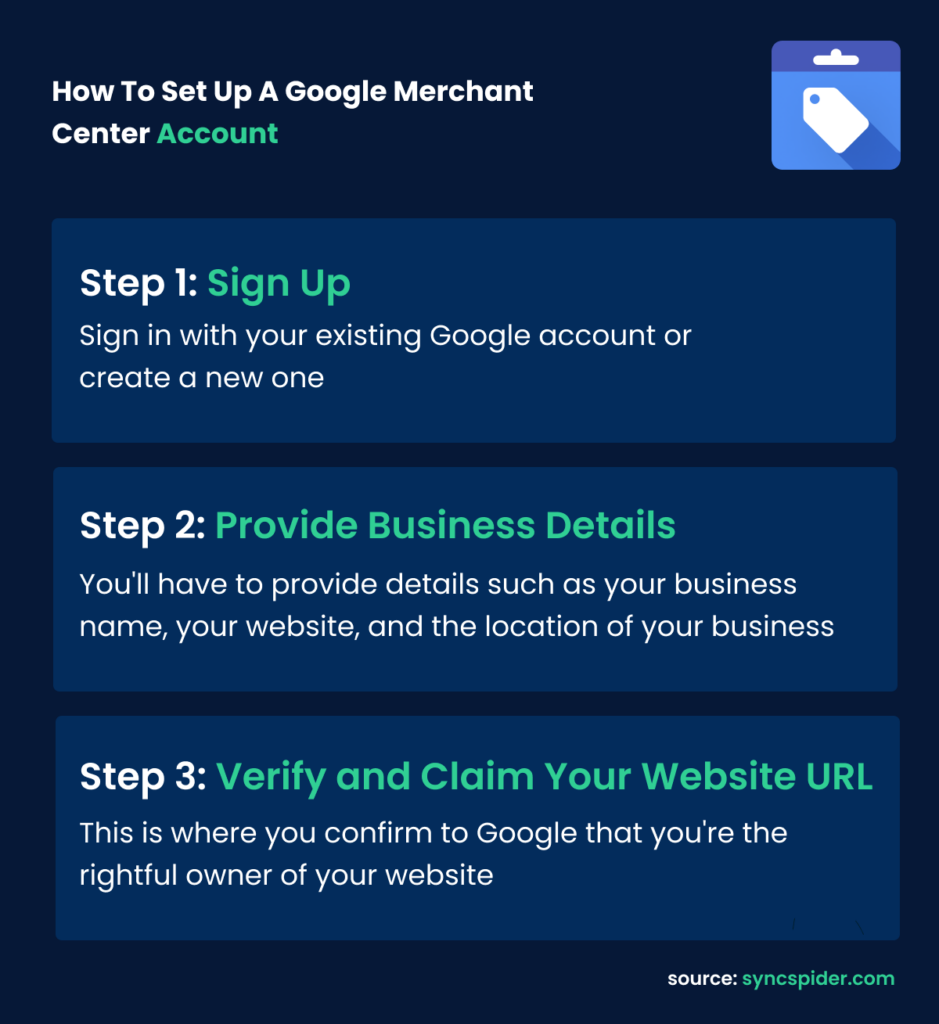
How To Set Up A Google Merchant Center Account
Setting up Google Merchant Center is pretty straightforward – it’s like setting up a new social media account. Trust us, no special tech skills are needed for this one!
Step 1: Sign Up
First things first, you’ll need to sign up (duh). Just head over to the Google Merchant Center website and click ‘Sign Up‘. You’ll have two options: sign in with your existing Google account or create a new one. This flexibility is perfect for keeping things organized in a way that suits you best.
Step 2: Provide Business Details
Once you’ve signed up, Google will need a little more information about your business. You’ll have to provide details such as your business name, your website, and the location of your business – just like filling out a simple form. This step is crucial as it helps Google understand your business better and ensures the right users see your product listings.
Step 3: Verify and Claim Your Website URL
Now comes an important part: verifying your website URL. This is where you confirm to Google that you’re the rightful owner of your website. Ah, we know – this may sound a bit technical for a common Joe. But just pay attention and Google will walk you through the process. There are a few ways to do it, like using Google Tag Manager or Google Analytics.
And just like that, you’ve set up your Google Merchant Center account!
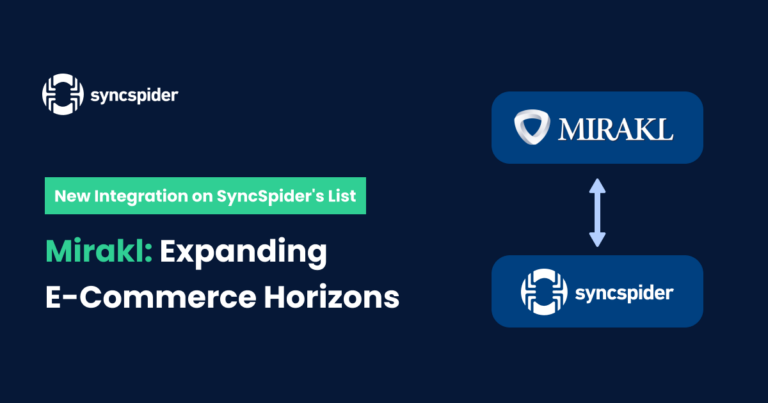
Integration Is the Key
Setting up your Google Merchant Center account is your first step in a larger journey. One of the major strengths of GMC is its allowance for integrations. Some of these can be performed directly on their platform, syncing seamlessly with your existing business systems. That takes a lot of weight from your back!
However, to streamline your operations even further and to link up with specialized eCommerce platforms, third-party integration tools like SyncSpider become invaluable. Here’s how SyncSpider connects GMC with these key eCommerce platforms:
Etsy: SyncSpider syncs your handcrafted Etsy product listings with Google Shopping, ensuring data consistency without the manual work.
Dokan: Running a Dokan multi-vendor marketplace? SyncSpider seamlessly synchronizes product data between Dokan and GMC, maintaining accuracy across all your channels.
PrestaShop: If you’re managing a PrestaShop store, SyncSpider makes integration with GMC a breeze. It takes charge of synchronizing your product data, freeing up your time.
Shopware: Leveraging Shopware’s robust functionalities? SyncSpider ensures a smooth product data flow between Shopware and GMC, keeping your listings up-to-date and accurate.
In short, integrations enhance your GMC experience, leading to better customer experiences and a more successful online store.
But don’t stop there! The next step is creating a product data feed – which is essentially a detailed list of your products and their information. Let’s jump right into it!
Uploading Your Product Data Feed
Before explaining how to upload your product data feed, we must make sure you’re all clear on what it is exactly.
What Is a Product Data Feed?
A product data feed is like a digital catalog of all the items you’re selling. It contains detailed info about each product like title, description, price, image URL, product category, and all the other details required.
Google uses this information to match your products with customer searches. This way, people can find it right away from their search bar – which is the whole point of GMC, as you can see by far.
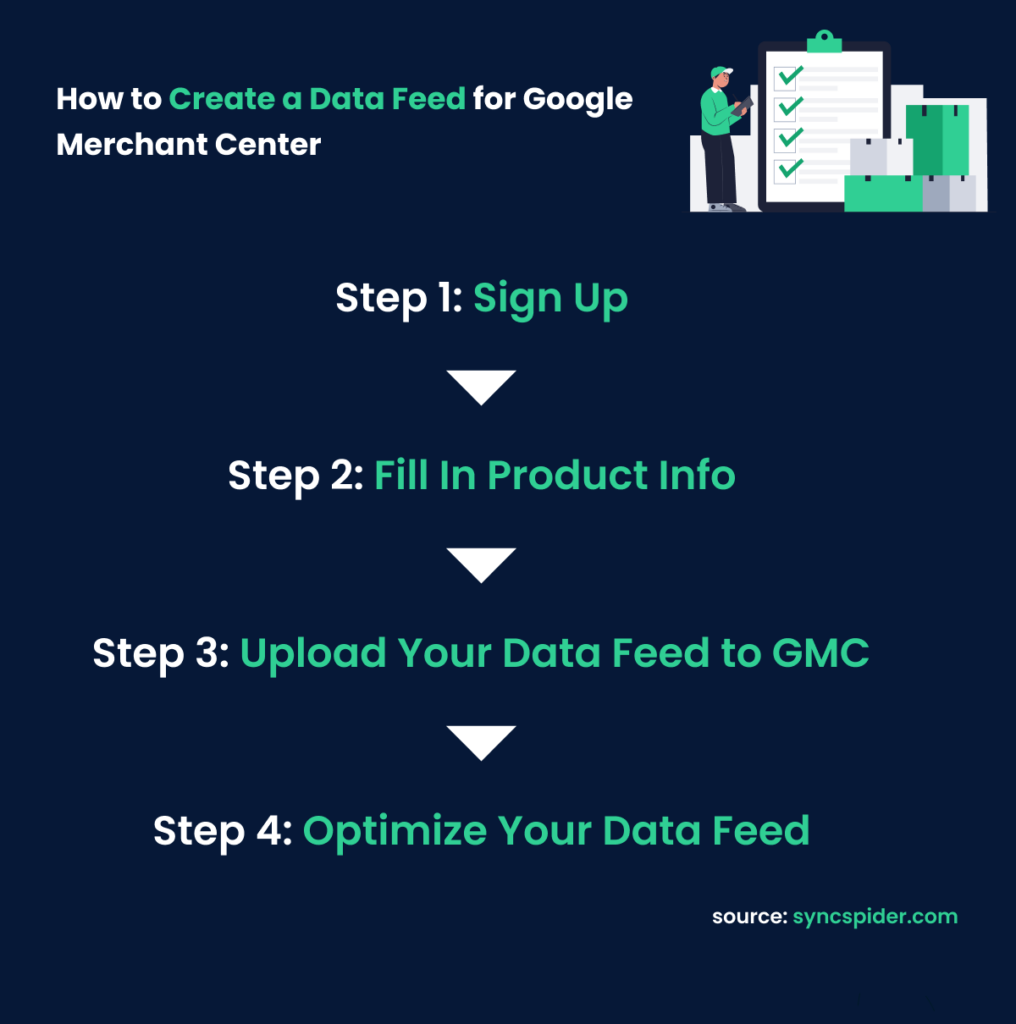
How to Create a Data Feed for Google Merchant Center
Just a heads up: to advertise your products with Google Shopping or through Surfaces across Google, your product feed must comply with Google’s Product Data Specification. Let’s create a data feed!
Step 1: Choose Your Method
There are a few ways you can create a product data feed:
- Automation with Feed Management Software: Automation is always a wise choice! This software is like your very own assistant. It takes your product details and creates a custom data feed for Google Merchant Center. Best part? It keeps updating your feed when your inventory changes.
This method is super flexible and makes it easy to adjust things as your campaigns grow. It’s a big time-saver, especially if you have lots of products and if your inventory changes often.
- Direct API Connection: Think of the direct API connection as a bridge between your eCommerce platform (like Shopify) and Google Merchant Center. This link allows your product data to be automatically updated in GMC whenever you make changes on your platform.
You don’t have API? If all the info of your products is just in your internal system, SyncSpider’s database connector can be of grave help to you! It’s a fast way to keep all the things synchronized. But keep in mind – it sends the data exactly as it is in your store, which might not be perfect for Google’s preferences. For more details, check out the Onboarding Guidelines.
- Data Export From Your Store: Imagine you’re taking a snapshot of your product data from your shopping cart and then putting that snapshot into a live file; that’s what data export from your store is like.
This method lets you take all your product data from your shopping cart and put it into a file that you update. It’s simple and gives you total control. But, the data will be exactly how it is in your store, which might not be the best for your Shopping Ads.
Step 2: Fill In Product Info
Once you’ve chosen your method and created your data feed file, it’s time to fill in all the essential details about each product.
Step 3: Upload Your Data Feed to GMC
After filling in your product info, upload your data feed file to your GMC account. Navigate to the ‘Products’ section, then click on ‘Feeds’ and follow the prompts.
Step 4: Optimize Your Data Feed
Next, optimize your data feed. Make sure your titles and descriptions are clear and descriptive, your images are high-quality, and your product categories are accurate.
 And that’s it! Just follow the simple steps provided by Google, and you can’t make a mistake.
Connecting Google Merchant Center with Google Ads Account
So, you’ve set up your Google Merchant Center account and your product data feed is all uploaded and ready to go. And now? To promote your products via Shopping Ads, you’ll now need to link your Merchant Center account to your Google Ads account.
Don’t worry, it’s a straightforward process:
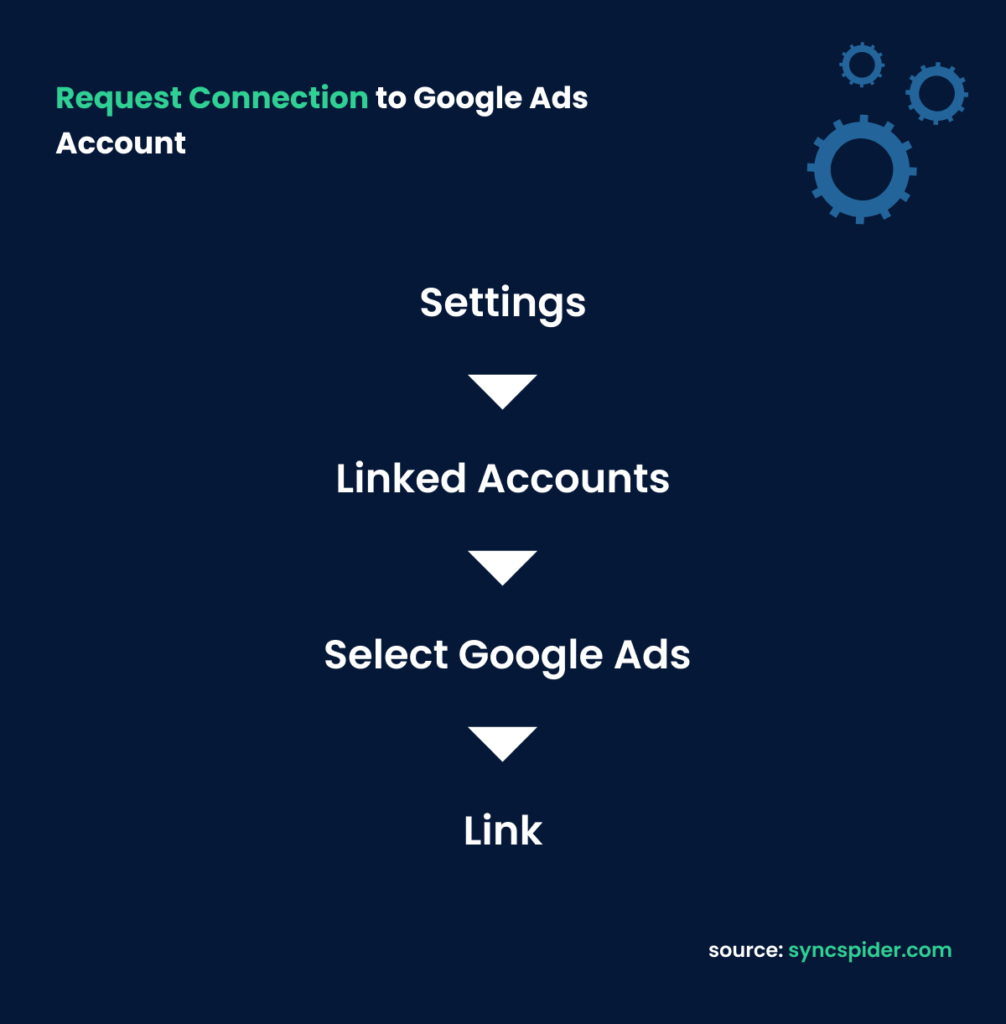
Step 1: Request Connection to Google Ads Account
Start by logging into your Merchant Center interface. Navigate to ‘Settings’, then ‘Linked Accounts, and select ‘Google Ads’. There, you’ll need to choose the correct Customer ID and then click ‘Link’. This will send a request to connect the accounts.
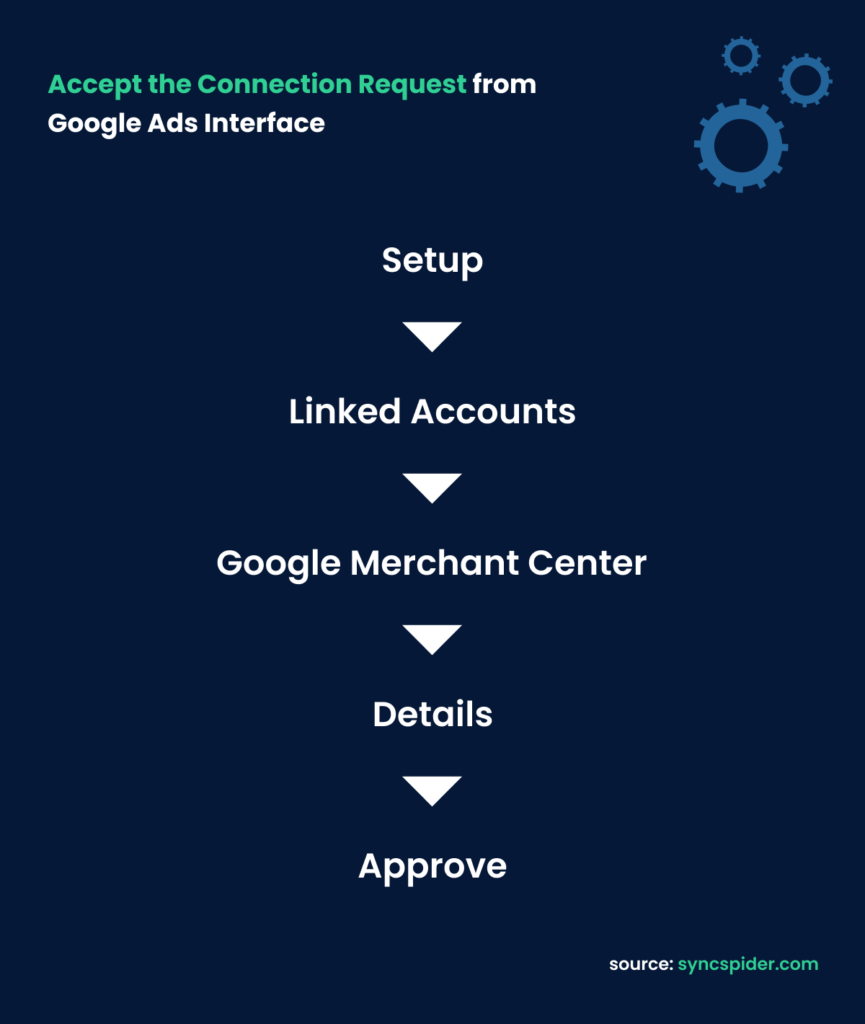
Step 2: Accept the Connection Request from Google Ads Interface
Next, you’ll need to accept the connection request on the Google Ads side. Simply click on the Tools icon, go to ‘Setup’ > ‘Linked Accounts’ > ‘Google Merchant Center’ > ‘Details’, and then hit ‘Approve’.
Hooray, your Google Merchant Center and Google Ads accounts are now connected, and you’re ready to start promoting your products with Shopping Ads. It’s that easy!
Benefits of Creating Shopping Ads
Creating Shopping Ads with your Google Merchant Center and Google Ads accounts is like putting a turbo booster on your eCommerce efforts. Here’s why:
- Higher Visibility: Shopping Ads put your products front and center when people are searching for them. It’s like having a storefront on Google’s homepage. With these ads, your products appear in a more visual and prominent way than normal search results, automatically driving more sales!
- Efficient Targeting: Shopping Ads are shown to people who are already searching for your type of products. No need for shouting out into the void – this way, you’re speaking directly to interested customers.
- Rich Product Information: With Shopping Ads, potential customers can see vital information like the product’s image, title, price, and your store’s name right on the search results page before they even click on the product! This makes it more likely they’ll check out your ad with the intent to purchase. This makes selling online so much easier!
- Performance Tracking: Like other Google Ads, you can see how your Shopping Ads are performing. This insight can help you tweak your campaigns for better results, of course!
In short, creating Shopping Ads can make a significant difference to your eCommerce success. Without a doubt, it can catapult your products in front of eager customers, all while providing you with valuable data to keep improving your campaigns. Trust us, it’s a tool that’s well worth investing in!
Managing Shipping Settings
Setting up your shipping costs in GMC is all about matching what your customers see on your website. If the shipping cost can’t be matched exactly, it’s better to overestimate what you submit to Google Merchant Center.
Putting yourself in your customers’ shoes is always helpful – keep in mind that they’re looking at these costs and the delivery speed when deciding whether to click on your product or not.
How to Set Up Shipping in GMC
Here’s a step-by-step guide to setting up your shipping costs:
Step 1: Create a New Shipping Service
- Log into your GMC account. Click the Tools and Settings icon (it looks like a gear) and select ‘Shipping and returns’. This will take you to the ‘Shipping services’ tab.
- Create a new shipping service. Click the ‘+’.
Step 2: Service Settings
- Name your service. Make it descriptive and unique. This is used for your reference only.
- Choose a service area where your products can be delivered. It doesn’t have to be where the order is shipped from or where your business is based.
- Select the currency used in the service area. Make sure it matches the currency listed in your feed.
- Specify the delivery location. Indicate where customers can receive their orders. You can choose ‘At the customer’s address’ or ‘Deliver to a collection point’ where applicable.
Step 3: Delivery Time
- Decide if you want to show custom delivery times based on your current carrier or set a range of delivery times.
- Set an ‘Order cutoff time’ – the time of day by which orders must be placed to process them on the same day.
- Set ‘Order handling time’ – the minimum and maximum number of days needed for processing an order.
- Set ‘Transit time’ – the possible range of business days this service could take.
Step 4: Shipping Cost
Now, you can set up your shipping cost. You’ll get to choose from several options such as free shipping, a fixed rate, or free shipping over a certain amount.
Holiday Shipping Cutoff
This feature is only available in two countries – France and the US (following the US Holiday system). If you’re in these countries, you can set a holiday shipping cutoff date for orders to be delivered by a certain holiday.
Remember, the main goal of managing your shipping and tax settings (we didn’t talk about this, but you can check it out here) is to create a seamless and positive shopping experience for your customers. We all love transparent and honest businesses – it makes us simply want to buy from them!
The Impact of Your Settings on Product Appearance in Google Shopping
The shipping and tax settings you’ve put in GMC directly impact how your products appear on Google Shopping. Here are the two main reasons:
- Transparency Appeals to Customers: When customers see your product listing, they not only see the price of the product but also the delivery cost. This helps them make informed decisions and increases trust in your store.
- Competitive Pricing Attract Buyers: Keep an eye on your shipping costs. If they’re too high, customers might look elsewhere. Try to strike a balance to remain competitive in the market.
Now, while all this is fresh in your mind, let’s check out some of the GMC tools and reports that will make your eCommerce life easier!
Google Merchant Center Tools and Reports
Navigating Google Merchant Center feels a lot like stepping into a well-stocked tool shed. Each tool and report sharpens your eCommerce strategy, helping you optimize your product listings and supercharge your campaign performance. Literally like having a set of tools to build your eCommerce to success!
Overview of Tools and Reports in GMC
Besides all the third-party tools you might run across, Inside GMC, you’ll find several handy tools that are just waiting to help you out. Let’s introduce the team:
Performance Dashboard: This tool gives you a real-time snapshot of your campaign’s vital signs, like your clicks, impressions, and click-through rate (CTR). So, you can quickly see if your campaigns are sprinting ahead or need a dose of energy.
Diagnostic Reports: This one scours your product listings for any issues and shines a light on them, allowing you to patch things up and ensure your campaigns are running smoothly.
Price and Availability: This one is super handy! It checks that your prices and availability match up perfectly with what’s on your website. If there are any discrepancies, this tool will wave a red flag, so you can fix things up – so you can relax knowing that everything is being monitored!
Feeds: Here, you can upload, manage, and monitor your product feeds. It’s kind of like your campaign’s kitchen, where you whip up the perfect product feed for Google Shopping.
Programs: This is where you can sign up for different Google programs, like Shopping Ads or Surfaces across Google. Think of it as your passport to new opportunities, because it really acts as one.
How to Use These Tools
Having these tools is cool, but knowing how to use them is crucial. There are numerous ways to implement all kinds of tools, but let’s focus just on these for this blog. Here are some pro tips:
Inspect Your Performance Dashboard Regularly: Just like you’d check your car’s dashboard while driving, regularly glance at your Performance Dashboard. It can give you important clues about how your campaigns are performing and where you might need to make some adjustments.
Fix Issues ASAP with Diagnostic Reports: If Diagnostic Reports spot any issues, jump on them. It’s like spotting a typo in an important email – the sooner you correct it, the better!
Ensure Accuracy with Price and Availability: Use the ‘Price and Availability’ tool to double-check your listings. In eCommerce, accuracy is king, and consistent information is the crown.
Keep Your Feeds Fresh: Regularly update your product feeds. You wouldn’t serve stale bread at a bakery, right? So keep your feeds fresh and up to date!
Explore Programs: Don’t be shy to try out new Google programs. They could lead your campaigns to new growth opportunities, you never know!
With these tools in your toolkit, you’re ready to tackle any challenge on your eCommerce GMC journey!
Recapping The Power of Google Merchant Center
Let’s recap the three most important aspects of GMC for your eCommerce business:
- Visibility: GMC helps your products stand out on Google.
- Reach: With GMC, you can reach customers who are searching for your type of products. Targeted advertising at its best!
- Insights: The tools and reports in GMC give you valuable insights into your performance. Use them to continuously improve your campaigns.
Now that you’ve learned what is the Google Merchant Center to the detail, and (most importantly) how to set up your account, you may go on to do just that!
We wish you all the luck in this fun e-commerce game!